
With the right timing settings, an alert reaches you only in the hours you trade. Setting it up is simple, fast and accurate. Tell or ask AI Trading Assistant by voice or in writing, for example "only during the London session". Or pick how often it fires, when it expires and your active hours on the Options tab.
When you build an alert with AI Trading Assistant, you can also say "Monday to Friday 08:00 to 17:00" in plain words. If you use the same choices on the Options tab for most alerts, save them as your defaults.
The example: an alert for EURUSD crossing above 1.09 on 5m candles. It should count only candles that close above 1.09, and only on weekdays from 09:00 AM to 05:00 PM.
Choose how often it can fire
Open the alert in the editor and click the Options tab. Trigger is at the top left.
Set Trigger to Once per bar close. A bar is one candle. A Confirmation timeframe box appears under it.
Set Confirmation timeframe to 5m, the same timeframe as the condition.
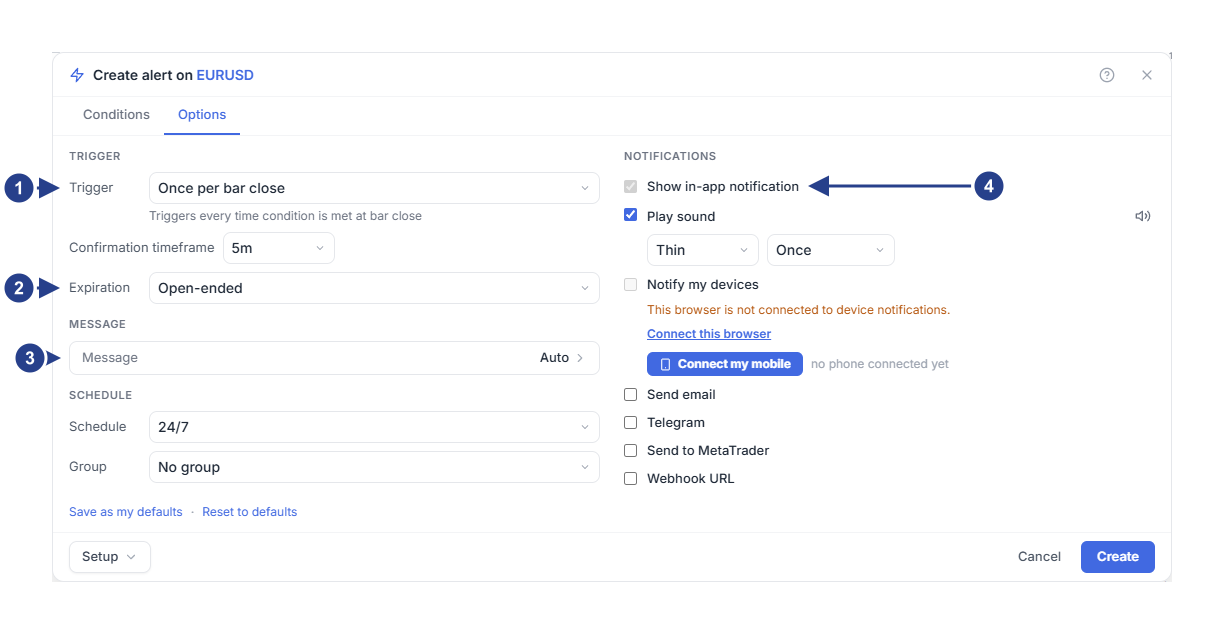
Trigger: how often the alert can fire. The line under it describes your choice.
Expiration: an end date for the alert. Open-ended means it has none.
Message: leave it on Auto for the automatic message. It says what happened, the price at that moment and whether the alert stays on.
Show in-app notification: always on. You can tick more places under it.
A new alert starts on Once only, unless you saved your own defaults. These are the four choices:
Once only: the alert fires one time, then stops. Its status changes to Stopped: Triggered. Choose it when you want to hear about a level once.
Once per bar: the alert fires at most once in each candle of the Confirmation timeframe, and keeps running. Choose it when you want to hear about a move right away, but not more than once per candle.
Once per bar close: the alert waits for the candle to close, fires at most once per candle and keeps running. Choose it when a spike that falls back before the close should not count.
Once per minute: the alert fires each time the condition happens again, with at least one minute between two alerts. It keeps running.
Whatever you choose, an alert fires when its conditions change from false to true. It does not fire again just because they stay true.
The Confirmation timeframe is the alert's own candle. Keep it equal to the condition's timeframe, unless you want a different candle on purpose.
When does the example fire?
Say EURUSD is at 1.0880 when you save the alert.
At 10:02 price rises to 1.0901. The 10:00 candle is still open. The alert waits.
At 10:05 that candle closes at 1.0908, above 1.09. The alert fires. Its message says "The 5m candle closed at 1.0908." and ends with "This alert stays on."
The alert keeps running. It fires again only after a candle closes below 1.09 and a later candle closes above it.
With Once only, the same move fires the alert at 10:02. Then the alert stops, and its message ends with "This alert is now off. It was set to fire once."
Choose when it stops
Leave Expiration on Open-ended for this example. The other choices end the alert at a set time:
End of day: at the end of today (23:59), by your device's clock.
1 week or 1 month: counted from the moment you save the alert.
Custom date: a date and time box appears. Enter the end in your device's local time. It must be in the future.
At the end, the alert stops and its status reads Stopped: Alert expired. Later, when you open an alert that has an end, Expiration shows Custom date with the exact end time, whichever of these you chose.
Choose the hours when it is active
Under Schedule, change 24/7 to Custom hours. Day buttons and two time boxes appear.
Click Mo, Tu, We, Th and Fr. Selected days turn blue.
Check the times. They start at 09:00 AM and 05:00 PM, the hours of this example. Some computers show them as 09:00 and 17:00.
Read the time zone beside the times. It is the time zone of your device.
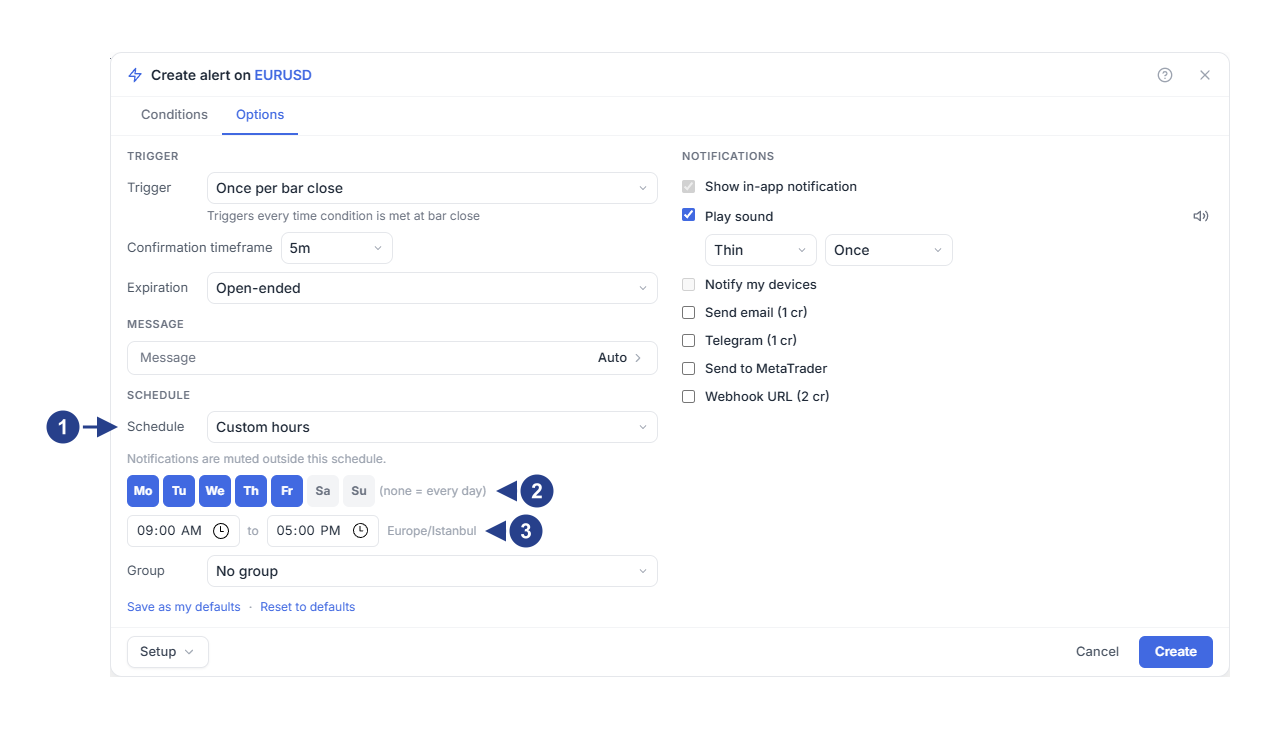
Schedule: 24/7 keeps the alert active all the time. Custom hours limits it to the days and hours below.
The days: blue days are selected. With no day selected, the hours apply to every day.
The time zone of the hours. It comes from your device.
Outside these hours the alert does not fire. Nothing appears in the Log, and nothing is saved to send later. Say a 5m candle closes above 1.09 at 07:40 on a Tuesday. The alert stays quiet at 07:40, and it stays quiet at 09:00 too. It waits for the next new crossing inside your hours.
For a night session, enter an end time earlier than the start, such as 10:00 PM to 06:00 AM. The hours after midnight belong to the day the session started. With Fr selected, the alert stays active until 06:00 AM on Saturday.
Put the alert in a group
Group, under the schedule, adds the alert to one of your groups. While a group is muted, none of its alerts are checked. You create and mute groups with the Setups & Groups button in the Alerts panel.
Save your choices as defaults
Press Save as my defaults at the bottom of the tab. The editor says "Saved as your defaults for new alerts." Each new alert then opens with your trigger, expiration, schedule and notification choices.
Defaults apply to new alerts only. An alert you open with Edit always shows its own saved options.
The group and the message are chosen for each alert. They are not part of the defaults. In the saved defaults, a Custom date becomes Open-ended, because an end date belongs to one alert.
A new alert for the symbol on your chart still takes its timeframe from the chart.
An alert you start from a drawing opens with the same defaults as any other new alert.
Reset to defaults deletes your saved defaults. The tab goes back to the starting options: Once only, with the places you have already connected ticked (a device, Telegram or MetaTrader). Send email and Webhook URL start unticked.
Good to know
The trigger never makes a condition check faster. Indicators, candlestick patterns, price moves, volume, and line breaks and bounces off conditions still wait for their candles to close.
An alert with only 4CM-AI forecast direction or change conditions has no Confirmation timeframe box. It fires as soon as a new forecast arrives, even when the market is closed. When a 4CM-AI alert also checks price or a zone, each forecast condition keeps its own timeframe. With a 4h forecast and a 5m Confirmation timeframe, the alert watches the 4h forecast. It uses 5m candles for the trigger and for candle closes inside Buy zone. With Once per bar close, the alert fires when a 5m candle closes. A zone visit during that candle counts, even if price left the zone before the close.
An expired alert stays in your list. To use it again, open it with Edit, choose a new Expiration and press Save. It becomes Active again.
If it does not fire
Outside your Schedule, the alert does not fire.
Stopped: Triggered in the Alerts list means a Once only alert has already fired. Stopped: Alert expired means its end has passed.
While its group is muted, the alert is not checked.
With Once per bar close, a spike that closes back below the level does not count.