
Many traders read the direction on a higher timeframe, then look for a price area on a lower one. With 4CastMachine AI and AI Trading Assistant, combining those forecasts with your technical conditions in one alert is simple, fast and accurate. Build the alert in a few clicks, or tell or ask AI Trading Assistant by voice or text to create it. You get one alert when everything lines up instead of checking three things by hand.
The example: on BTCUSD, you want to know when price enters the 1h Buy zone. The 4h forecast should be bullish, and RSI(14) on 1h should be above 50.
Build the alert
Open BTCUSD in 4CM-AI Charts, click the lightning icon (Alerts) in the top toolbar and press +.
In the first row, choose 4CM-AI, set the timeframe to 1h, and choose price enters Buy zone. Start with the condition you are waiting for.
Press + Add condition. In the new row, choose 4CM-AI on 4h and select turns bullish. The zone visit has not happened yet, so you can choose the direction even when the 4h forecast is already bullish.
Press + Add condition again. Choose RSI on 1h, keep the period at 14, choose is above and type 50.
Leave every join on and. Read the summary. It must list all three conditions.
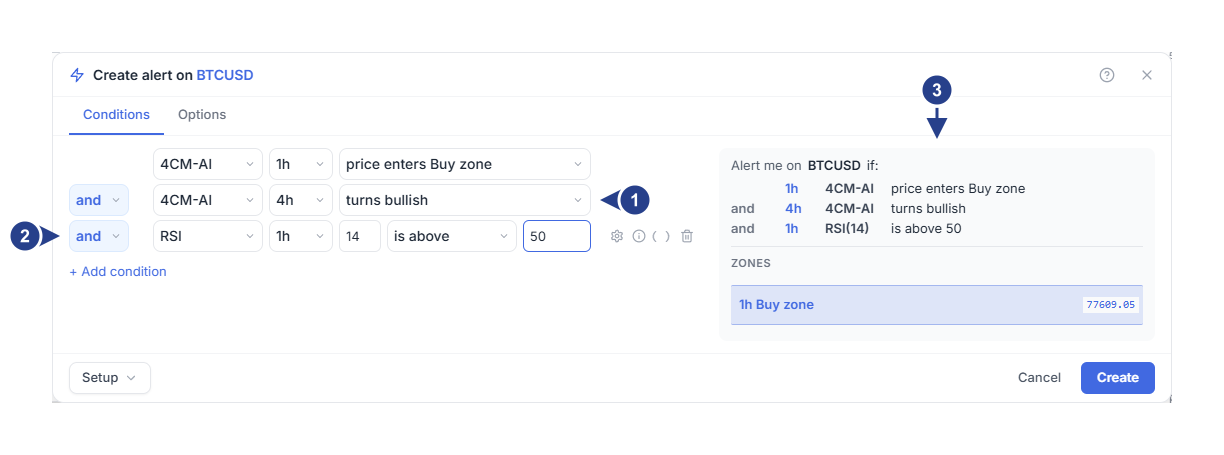
4h turns bullish: the direction of the higher timeframe. It must be true at the moment the alert fires.
and: the RSI condition joins the alert. Other conditions always join 4CM-AI conditions with and.
Alert me on BTCUSD if: all three conditions in order. Below them, Zones draws the 1h Buy zone. This zone is so narrow that its upper and lower prices show the same number, so the figure shows one price.
On the Options tab, Trigger starts on Once only, unless you saved your own defaults. Press Create. The editor first checks that both forecasts are up to date. If every row in the alert is a forecast direction or change condition, there is no Confirmation timeframe. Those alerts fire the moment the new forecast arrives.
When does it fire?
The conditions can come true in any order. and means that all of them must be true. It does not mean first this, then that.
Say you save the alert at 09:00, while the 4h forecast is bearish.
At 10:05 price drops into the 1h Buy zone. The 4h forecast is still bearish, so the alert does not fire yet. It remembers the visit.
At 10:40 price leaves the zone. The visit stays remembered.
At 12:00 the 4h forecast turns bullish, and RSI on 1h is 54. All three conditions are now true, so the alert fires.
If the 4h forecast is bullish first, the alert fires at the zone visit instead. The forecast must still be bullish then. If it turns bearish again before the visit, the earlier bullish reading does not count.
The 1h Buy zone comes from the 1h forecast. Say the 1h forecast turns bearish at 11:00. A bearish forecast has no Buy zone. The alert forgets the 10:05 visit, and it does not fire at 12:00. After the 1h forecast turns bullish again, price has to touch the new 1h Buy zone.
What does the alert remember?
Moments are remembered. This covers new direction or pivot and new forecast, the zone conditions and technical moments such as crosses above. Once one has happened, it counts until the alert fires, even after price leaves the zone.
A zone visit counts even if price was already inside the zone when the alert started watching.
When the forecast of the zone's timeframe changes direction, the alert forgets the visit. A bullish forecast has no Sell zone, and a bearish one has no Buy zone. Price has to touch the zone again after the change.
The zone can also change while the direction stays, for example after a new pivot. The alert then looks back at prices since it started watching. If price touched the new zone at any moment in that time, the visit counts. In that case, the alert's message says when price reached the zone and that the zone was updated after that. If price did not touch the new zone, the alert forgets the visit.
Directions are checked at the last moment. The choices turns bullish, turns bearish and is range bound must be true when the alert fires.
Other conditions that stay true, such as is above, use their latest value.
A candlestick pattern counts only on the candle where it completes.
The alert forgets what it remembered when it fires, and when you change its conditions, Trigger, Expiration or Schedule. It also forgets when you pause it and start it again, and while it is outside its schedule or its group is muted. Changing only the message or the notifications keeps what it remembered.
From a fresh start until the alert fires, the Alerts list shows the status under the alert name. It reads, for example, "Forecast · Cycle 2 · Waiting for your conditions". The number counts how many times the alert has started watching from the beginning.
An alert with only direction conditions can fire again only after the forecast turns away from that direction and back.
Use or between forecasts
To hear about a change on either 1h or 4h, give both rows new direction or pivot. Then set the second row's join to or.
One timeframe can hold one direction and one zone condition. To accept either of the two, keep their rows next to each other. Move the mouse over the first one and press ( ). Then set the join inside the parentheses to or. Leave it on and when you need both.
Rules the editor checks
Some combinations cannot be saved. The editor names the problem:
Two directions, or two zone conditions, on the same timeframe: "One 4CM-AI direction and one zone condition per timeframe."
Some 4CM-AI conditions joined with and, others with or, apart from a direction and zone pair in parentheses: "Put all 4CM-AI conditions in one group with one and/or between them."
A 4CM-AI condition joined to other conditions with or: "Combine 4CM-AI conditions with the other conditions using and. Put the other conditions in parentheses to use or between them."
Parentheses that hold a 4CM-AI condition together with another condition, including parentheses the editor draws: "Keep 4CM-AI conditions out of parentheses that contain other conditions."
Among the other conditions you can still use or and parentheses. As a group, they join the 4CM-AI conditions with and.
Good to know
4CM-AI conditions are included with every active membership. They work on symbols that have a 4CastMachine AI forecast, in the markets your subscription plan includes. An alert with more than one condition also needs a subscription plan that includes multi-condition alerts.
Saving an alert never fires it. If all its conditions are already true when the alert starts watching, it waits for something new, such as the next candlestick pattern. An alert made only of directions that are already true cannot be saved. The editor says "This direction is already true. Add another pending condition; creating an alert does not trigger it."
In the Log tab, the entry starts with what happened, with one line for each condition that was met. Click Why this forecast alert fired to see each condition's time. The alert can fire long after the zone visit, so the line with the symbol reads Forecast update instead of one price.
A Line condition works here too. A line that 4CastMachine AI drew is kept as it was when you chose it. Its details read Fixed forecast reference. Moving your own line updates the condition. Deleting it pauses the alert.
If the alert's status reads Error, one of its technical conditions cannot be checked. Open it with Edit, fix that condition and save.
If it does not fire
Read the line under the alert in the Alerts list:
"Waiting for your conditions": at least one condition is not true yet. Compare the Forecast panel and the chart with your conditions.
"Waiting for the selected zone": the latest 1h forecast has no Buy zone right now.
"Waiting for technical condition data": the RSI condition has no up-to-date value yet.
"Conditions were already true. Waiting for a new match": everything was true when the alert started watching, so it waits for the next change.
"Outside your schedule" or "Alert group muted": the alert cannot fire until the schedule opens or the group is unmuted.