
For each forecast timeframe, 4CastMachine AI can mark a Buy zone and a Sell zone on the chart. A zone alert makes catching those levels simple, fast and accurate. You look at the chart when price reaches the zone instead of waiting all day. Build the alert in a few clicks. Or tell or ask AI Trading Assistant by voice or text to create it.
The example: EURUSD trades above its 4h Buy zone, and you want to know when price comes down into it.
Create the alert
Open EURUSD in 4CM-AI Charts, click the lightning icon (Alerts) in the top toolbar and press +.
In the first box of the row, choose 4CM-AI.
Set the forecast timeframe to 4h. Use the timeframe of the zone you see on the chart. A 4h Buy zone and a 1h Buy zone are different zones.
In the last box, choose price enters Buy zone. This one choice sets both the zone and what has to happen.
Look at Zones under the summary. It draws the zone the alert will watch. The upper price sits on the top edge, the lower price on the bottom edge.
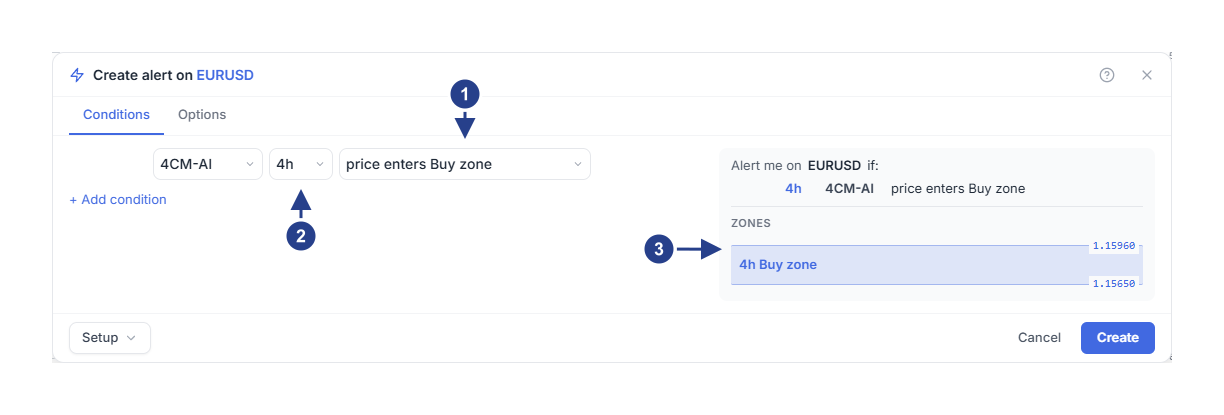
price enters Buy zone: the zone and what has to happen.
4h: which forecast the zone comes from.
Zones: the zone the alert watches, here the 4h Buy zone from 1.15650 to 1.15960. Check it before you save.
If the latest forecast on that timeframe has no Sell zone yet, the Sell choices end in · waits for it. You can still choose them so the alert waits for the next forecast with a Sell zone. Under Zones, the note reads "The latest 4h forecast has no Sell zone yet. The alert waits for one." Only when no forecast is available on that timeframe at all do the choices end in · not available. While a zone loads, Zones shows a dashed box that reads Loading zone….
If the editor cannot load the forecast, a red message with Retry appears at the bottom of the window. Press Retry.
Start from the chart
Right-click inside a zone on the chart and choose Track forecast zone.
Or, in the Forecast panel, press the zone button beside a timeframe (Add or edit a zone condition).
The editor opens with price enters Buy zone or price enters Sell zone on that timeframe. If the symbol already has a forecast alert linked to the Forecast panel, the zone is added to that alert. The title then starts with Edit alert on. Check the symbol, the timeframe and the zone before you save.
Choose what has to happen
The last box offers three choices for each zone:
price enters Buy zone fires the moment price moves into the zone. The edges count as inside.
price approaches Buy zone fires earlier, when price comes within a distance you set. Choose it when you want time to prepare.
candle closes inside Buy zone waits for a candle to close inside the zone. Choose it when a quick spike into the zone should not count.
The same three choices exist for the Sell zone. Switching between them keeps the distance you set.
Set the approach distance
With price approaches Buy zone, a second line appears under the row: within, a number and a unit.
Percent: a percentage of the closer edge of the zone. The starting value, 0.2, is about 0.0023 on EURUSD near 1.1596.
Price distance: a fixed distance in price, such as 0.0010 on EURUSD or 15 on XAUUSD.
× ATR(264, D): a multiple of the symbol's daily average candle range over 264 days. It scales automatically across symbols and volatility.
The same number means very different things in the three units, so check the unit after you type.
Wait for a candle to close inside
Choose candle closes inside Buy zone.
Open the Options tab. The Confirmation timeframe field is there for this condition.
Set Confirmation timeframe to 15m.
After price enters the zone, the alert waits for a 15-minute candle to close inside it. The forecast timeframe, 4h, decides which zone. Confirmation timeframe, 15m, decides which candle has to close inside it.
When does it fire?
Say EURUSD is at 1.1650 when you save the alert. The 4h Buy zone runs from 1.15650 to 1.15960, as in the picture.
With price approaches Buy zone and 0.2 Percent, the alert fires when price falls to about 1.1619.
With price enters Buy zone, it fires at 14:20, when price falls to 1.1594 and is inside the zone.
With candle closes inside Buy zone and a 15m Confirmation timeframe, it fires at 14:30 if that 15-minute candle closes at 1.1590. If the candle closes back above the zone, at 1.1610, the visit does not count, and the alert waits for the next one.
With Once only, the alert fires one time and then stops. New alerts start on this choice, unless you saved your own defaults.
See what happened
Open the Log tab of the Alerts panel. The entry starts with what happened, for example "EURUSD entered the 4h Buy zone". The line under it gives the price and the zone: "Price 1.15940, zone from 1.15650 to 1.15960." The line with the symbol reads Forecast update. Click Why this forecast alert fired to see the zone, its prices, the price at that moment and the time. Click Open chart to open the chart on the zone's timeframe. If the alert has several timeframes, it opens the lowest one.
Zone alerts saved before the current editor show Why this zone alert fired instead.
Good to know
If a zone is not in the current forecast, its choices end in · waits for it. You can still create the zone alert now. It waits for a forecast that includes that zone. Or use a forecast change alert, such as new forecast on D.
If the zone is the alert's only condition and price is already inside it when you save, that visit does not count. Price has to leave the zone and come back. One long visit gives one alert. When the zone changes, the alert watches the new zone from that moment. If price is inside the new zone at that moment, it has to leave and come back first. The same holds when the alert joins all its conditions with or, as the Forecast panel's alert does.
The zone can also join other conditions with and, such as a direction or a candlestick pattern. Then a visit counts even if price was already inside the zone when the alert started watching. The visit still counts after price leaves the zone. If the zone's forecast changes direction, the alert forgets the visit. Price has to touch the zone again after the change. The zone can also change in another way, for example after a new pivot. Then the visit counts only if price has touched the new zone since the alert started watching.
On every timeframe except D, a zone keeps its edges until its forecast changes direction or gets a new pivot. The pivot is the forecast's key price, shown in the Forecast panel. A zone of the D forecast can move whenever that forecast is updated.
On the chart, the zone your alert watches shows a small lightning mark near its top-right corner. The mark follows the zone when the forecast moves it. It is grey while the alert is paused, and it goes away once the alert has stopped.
With Once per bar close, the alert fires only when a candle of the Confirmation timeframe closes. A visit during that candle still counts, even if price left the zone before the close. If you want the candle to close inside the zone, choose candle closes inside Buy zone or candle closes inside Sell zone.
Outside the hours you set under Schedule, the alert does not fire, and a visit is not kept for later.
4CM-AI conditions are included with every active membership. They work on symbols that have a 4CastMachine AI forecast, in the markets your subscription plan includes.
If it does not fire
Read the line under the alert in the Alerts list:
"Waiting for the selected zone": the latest forecast has no such zone right now.
"Waiting for live prices": no live price has arrived for the symbol in the last half minute, for example while its market is closed.
"Waiting for a valid forecast": the forecast of that timeframe is not available right now.
"Outside your schedule" or "Alert group muted": the alert cannot fire until the schedule opens or the group is unmuted.